updated 11/12/08

|
Canoe from the
Gilbert Islands (Kiribati), Micronesia
|
|
click on pictures for larger images
Historical Notes
The picture Europe has (had) of the Southern Seas
is still very much
the product of the great voyages of the discoverers of
the 18th Century: Wallis, Cook, Bougainville, to name just a few of
more the
important commanders. Experiences made and impressions gained by
various travellers found their way into the World literature, think of
Melville, Stevenson or Chamisso. Fine art, particularly the paintings
by Gaugin, also shaped our mental picture. The liberal social customs
of the (female) islanders fired the imagination of the male European
population - who doesn't know the story of the mutiny on HMS Bounty !
The interest in and the scientific instrument to
investigate foreign cultures slowly developed over the past 200 years.
So much of the material and spiritual culture of Oceania disappeared or
was replaced (often deliberately) by European goods and concepts before
it could be documented. A process that accelerated since the early
decades of the 19th century due to increasingly frequent contacts with
European and US whalers, traders and missionars. This affected also the
perhaps most important cultural and technological achievement of
Oceania, namely the sea-going boat and the navigational traditions
without which the settlement of the Pacific Islands would not have been
possible.
Based on the geographical situation and the
ethnographic results of a complex history of settlement (e.g.
IRWIN, 1994) today we
distinguish the three
mega-regions of Melanesia (i.e. the islands of the dark-skinned
people), Polynesia (i.e. the region of the numerous islands), and
Micronesia (i.e. the region of the small islands). The cultures of
Poly-
and Micronesia are particularly characterised by the absence of metals
and pottery, which is due to lack of suitable raw materials. In
pre-European times all artefacts were made without the use of metals.
Considering the type and limited availability of raw materials the boat
building techniques were at an amazingly high level of development. In
many regions sophisticated techniques for assembling big boats, or
rather small ships, from small planks had been developed. However, such
boat largely had ceased to be built before the first Europeans had the
opportunity to view them. Nevertheless the first travellers were
suitably impressed by their size and numbers. Today, traditional boat
building is only practised in a few remote regions that do not have the
resources to acquire the products of Western technology.
These important cultural achievements, as
consequence, have almost completely disappeared from the daily life and
relegated to museums (e.g. the Bernice
P. Bishop Museum on Hawaii). The
Ethnographical Museum
in Berlin is lucky enough to have collection of
several of the most important boats from Oceania. Most have been
collected during the early years of the 19th century, when parts of
Micronesia and Melanesia were colonies of the German Empire. Others
have been built to order for the museum after WWII or collected during
the expeditions of its then director Gerhard Koch. Next to original
specimens
and models in other museums (in Europe e.g. those in Hamburg, Bremen,
Paris, London) provide the field research and compilations by HADDON and HORNELL
(1936-38)
and NEYRET
(1976) the most
important source for
the prospective modeller. In addition there is a great number of
monographs and journal articles concerned with the material culture of
the various archipelagos, including their boat building traditions. An
overview over this literature provides e.g. the bibliography by GOETZFRIDT
(1992).
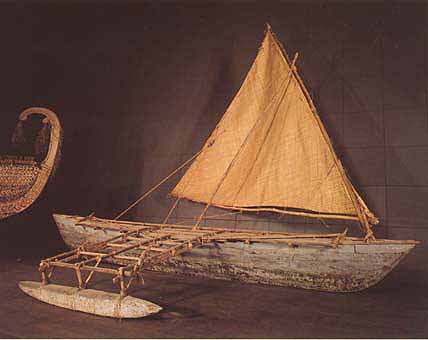
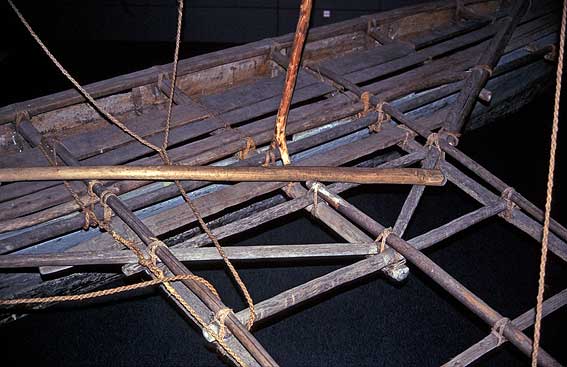
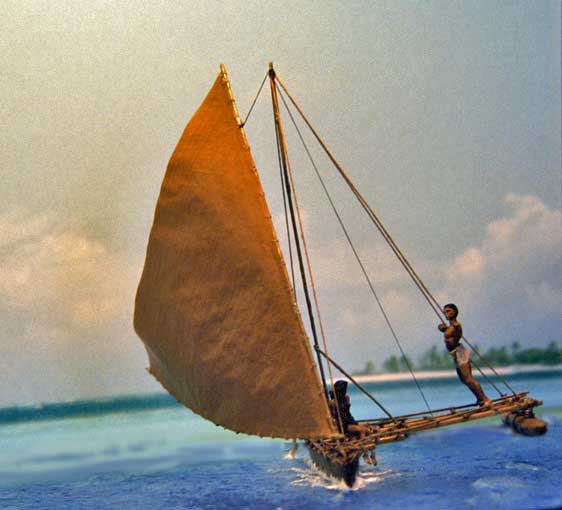
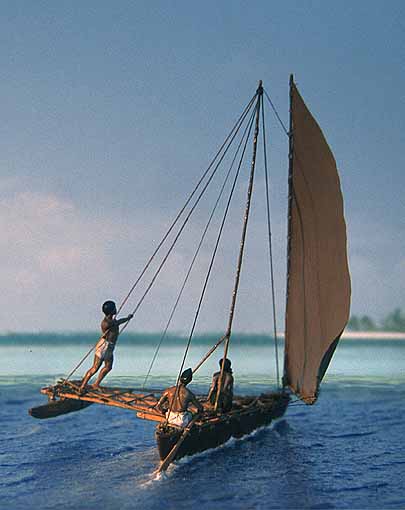
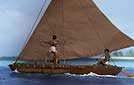
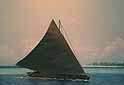
The Prototype
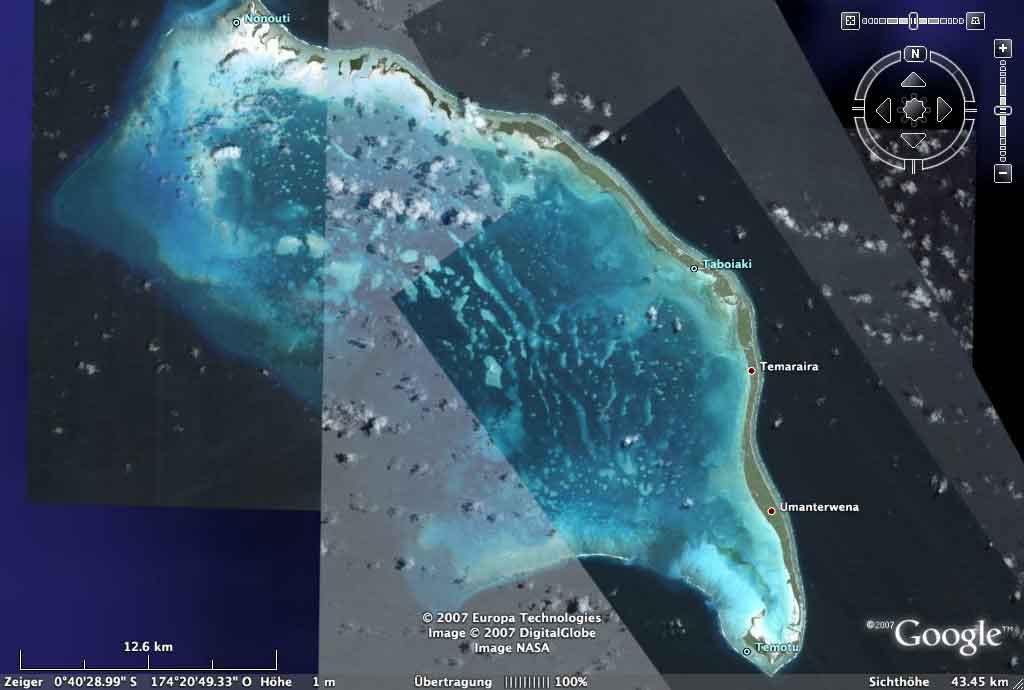
The sail-powered outrigger boat (Fig. 1)
from the Gilbert
Islands (Fig. 2) attracted my
attention already during my very first
visit to the museum in Berlin in 1973. With permission by the museum I
have been able to photograph the boat with all its details and to make
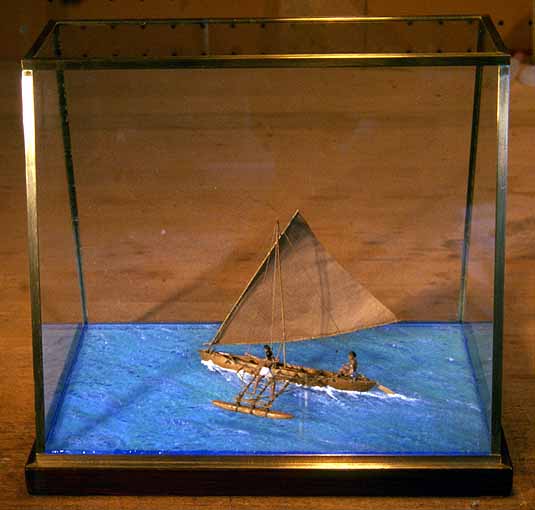
sketches and measurements in preparation for the model (Fig. 5) in 1995. The
most important scientific study on these boats is that of GRIMBLE (1924), whose observations
have been largely
confirmed by DREWS (1945).
According to the
field research by
KOCH (1961, 1984) in the 1950s the
techniques did not fundamentally change, but the construction of the
museum boat, which was built in 1951 and transferred to the museum in
1964, was somewhat simplified in comparison to the sources quoted.
The culture and, hence, the boat building
tradition was largely determined by the scarce resources of the low
coral islands of the Gilbert archipelago (Fig. 3). Nevertheless, the
indigenous
pandanus, coco nut and mangrove provided suitable raw materials for
boats, though really suitable timber is extremely scarce. To become
boat owner required the acquisition of a suitable supply of timber
first. In spite of those limitations the Gilbert islanders managed to
develop the fastest sail-powered boats of World that are not based on
modern science and engineering technology. Given the right wind and sea
conditions on the inner lagoons of the atolls, these boat reach a speed
of 20 knots.
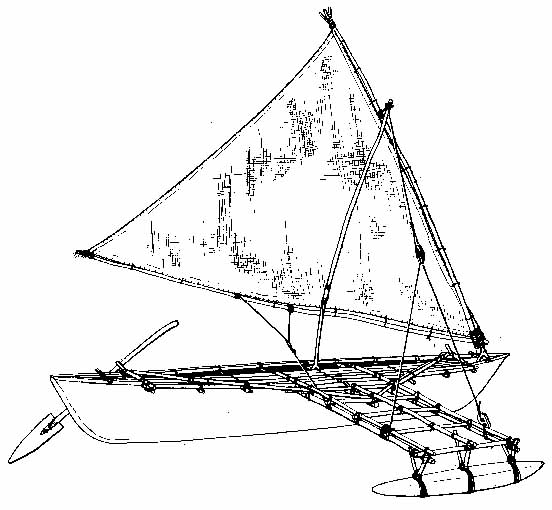
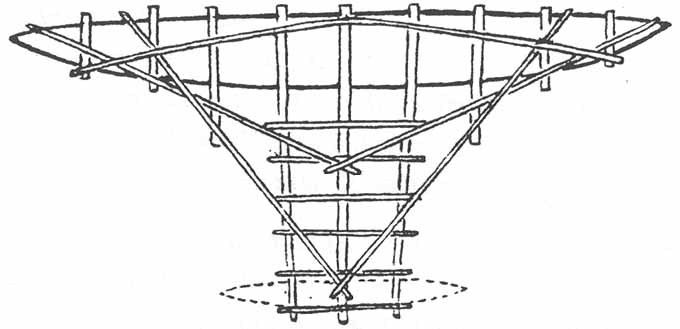
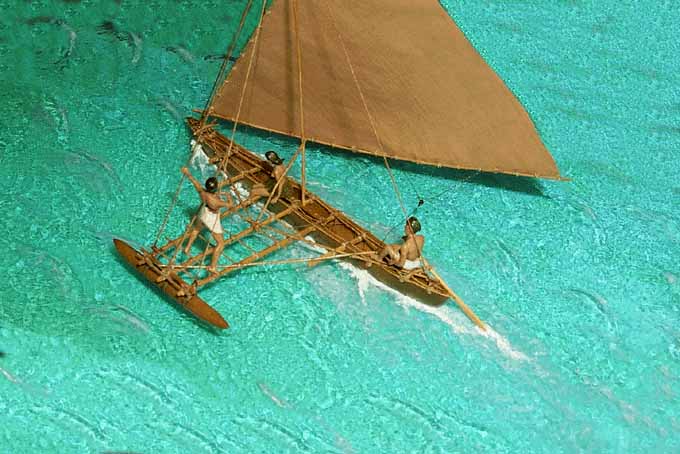
The boats from the Gilbert Is. (Fig. 4) differ
from most of the other boats of similar size in Oceania in that
they are not real dugouts or 'extended' dugouts, but are constructed
from planks on a keel (Fig. 6);
though the keel could be possibly
interpreted as a rudimentary dugout (c.f. GREENHILL
,
1976). This rather sophisticated technique probably was developed by
necessity, as no real trees were available on these poor islands. In
the old days the planks were shaped from the timber using axes and
adzes. The latter traditionally having blades made from the Tridacna spec. mussel. In historic times
tools made from imported steel or even imported tools were used. Given
the rather knotty and crooked trees the rule was: one tree trunk = one
plank. Since ready cut planks became available from European and
particularly North American sources these were preferred and the sides
of the boats built up from continuous strakes. It was interesting to
observe that the old techniques were revived when timber imports
stalled during WWII.
 |
 |
 |
 |
 |
|
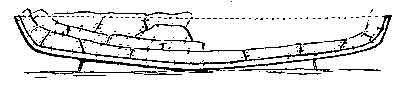
(6) Planking diagram
|
(7) Keel piece set up
|
(8) Cross section
|
(9) Rabetted stem piece
|
(10) Spacer sticks
|
| (GRIMBLE,
1924) |
The following paraphrases the prototype
building description by GRIMBLE
(1924). After various preparations of logistic and spiritual nature the
building proper began by propping up the three-sided keel (Fig. 7) that
receives a groove along its central line to act as a bilge (Fig. 8).
Ideally the keel is made up from one piece. Trestles and pegs coerce
the timber into the desired shape, that is a slight hog. In addition,
it is made slightly concave, opening towards to the outrigger, the
objective of which is to counteract the drag caused by the outrigger.
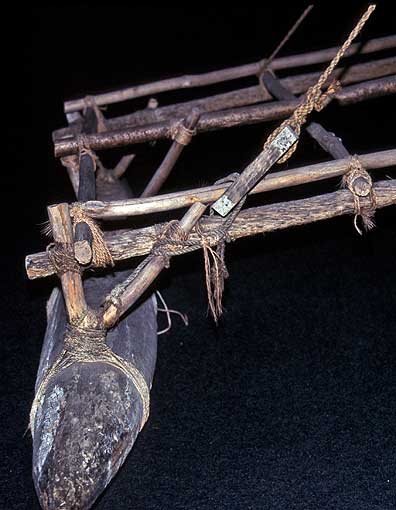
The stems (the boat is symmetrical) also have a triangular
cross-section an receive a shallow rabbet (Fig. 9). The actual shape of
the stem pieces are determined by the available timber, but the builder
tries to achieve a symmetrical appearance. Keel and stem pieces are
butted together only. The fit is tested using a touching-up paste made
from soot. The pieces are lashed together using twine made from coconut
fibre. The passage of the cord is recessed to limit chafing when the
boat is hauled ashore etc.
The hull is built up by the shell-first method. The
main cross-section
is slightly asymmetric (Fig. 8),
as with most outrigger boats, in order
to counterbalance the turning moment of the outrigger. The side facing
away from the outrigger is almost flat and vertical. This asymmetry is
obtained by a simple former that spreads out the keel-planks (Fig. 10). The strakes
run parallel to the keel (Fig. 6).
Their individual pieces are carefully fitted
to each other using the touching-up paste. The planks are lashed
together along their edges using twine made from coconut fibre and
caulked with pandanus leaves that had been chewed(!) through and oiled.
The hull is coerced into its final shape using thin branches as
spacers. Once the master boatbuilder is satisfied with the shape,
half-frames are fashioned from suitable pieces of wood and tied down
with
twine (Fig. 8). All cord
running on the outside of the hull are recessed.
The frames reach somewhat above the topmost planks (Fig. 8) in order to
provide a fixing point for two pairs of stringers that run in- and
outboard along the sides of the hulls and fashioned from rather
straight thin branches.
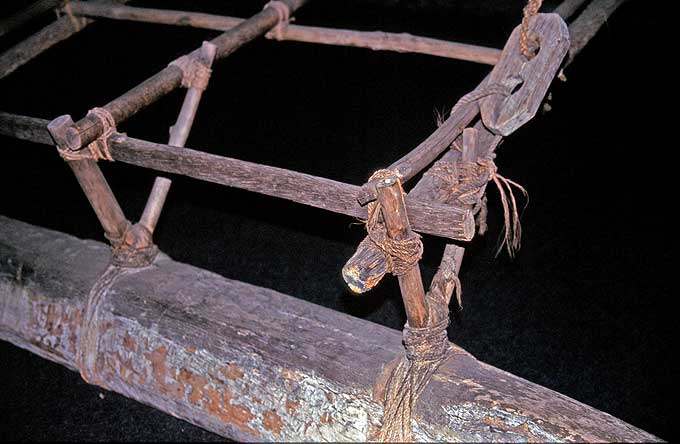
A further stiffening of the shell is provided by the various
members of
the outrigger that run across the wales (Fig. 11). The main beams are
recessed into the 'wale' (Fig. 8).
Whenever members of the outrigger cross each
other or suitable parts of the hull, they are tied together using
coconut twine. The main beams also serve as seats when paddling and
steering. The outrigger parts are constructed from well-seasoned pieces
of the coconut palm tree (Fig. 13).
As the native wood has a too high density to
be useful as float, the islanders have to rely on flotsam. Suitable
pieces are treasured to the day they are needed for this purpose. Each
archipelago and each island has its own technique for joining the float
with the outrigger. Here short, Y-shaped pieces are lashed on top of
the float first (Fig. 14). The
main beams are then lashed to these
pieces (Fig. 15).
After completion,
hull is
sanded down using shark or ray skin and receives protective coatings of
oil and a lime wash.
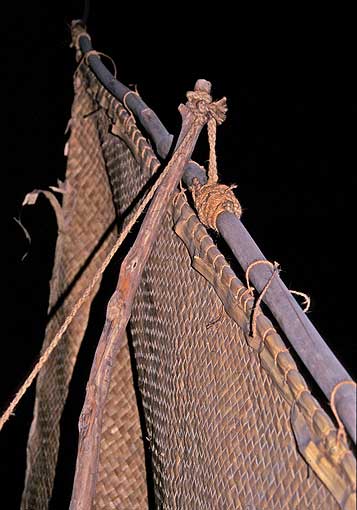
The triangular sail originally was woven
from strips of pandanus
leaves (Fig. 16). The process
of bleaching, beating soft and weaving is very
labour-intensive and sails cut from imported canvas had replaced the
traditional ones for decades. Canvas, however, has the disadvantage of
drying more slowly after the boat should have happend to be ditched
than sails made
from oiled pandanus leaves. Today, sails made from synthetic fibres are
preferred. The sail is bent to a 'yard' and a 'boom' using short
pieces of twine (Fig. 16). A
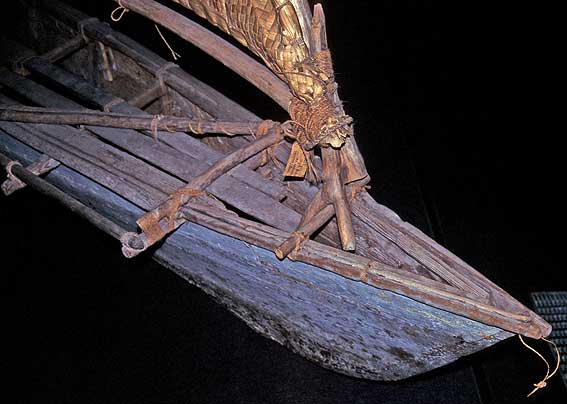
rather massive piece of wood with several
depressions serves as mast spur. These depressions allow for varying
trims of the rig. The 'standing' rig consists of two stays and a branch
with a crotch at its end that supports the mast on its windward side (Fig. 12 and 13).
There are also a couple of shrouds fastened to the outrigger. The yard
is hoisted by a halliard running through a hole in the mast. The sheet
is not directly bent to the boom, but to a primitive block running
along a bridle, but not actually forming a purchase. The shrouds may be
rigged in a similar fashion. Perhaps this is an imitation of European
rigging practice. The yard is either made from a long branch ending in
a crotch, or has a short piece with a crotch tied to it. This crotch
rests on the forward-facing of the two short cross-pieces that are
provided at each end of the boat (Fig.
17).
When going through the wind the sail is shifted around and the
crotch rested in the cross piece on the other bow. The boat is always
sailed with the outrigger wind-wards. It is steered with a paddle
fashioned from a single piece
of wood. The paddle is tied to a special rest on the respective stern
of the boat. Conversely, the paddles used for propulsion are built up
from two pieces of wood. The boat's equipment is completed by a bailer
and a pierced big chunk of coral serving as anchor.
The Model
The model was
constructed in 1:87 or HO-scale, mainly because the
German company PREISSER produces figurines that can be used to create
the 'islanders'. The hull of the model was shaped from Westindian
boxwood (Costelo). Costelo is
rather similar to the European or Asian boxwood in grain, texture and
workability, but rather cheaper. On the PROXXON table saw a billet of 6
by 7 mm cross-section and of 95 mm length was cut from the stock. The
further shaping was carried out very much like you would do on a solid
hull model, but on a rather small scale. Side elevation and 'deck' plan
were constructed on the computer from the available drawings. This has
a number of advantages: the endless reproducibility also at different
scales; mirror images of parts can be produced without loss in quality;
etc. The billet was marked with an inscribed centre line for reference
and printouts of elevations deck plan stuck on with just a bit of PVA
glue. The shape of the hull was then roughened out on the table saw
first. For the next step the stationary drilling machine was converted
something like a drum sander by mounting one of those expanding
mandrels for emery paper tubes. The hull billet was passed along the
drum free-handedly to round off the plan view. Both ends were cut off
according to the rakes of the stem pieces. A couple of paper templates
serve as guides for sanding the billet to the desired unsymmetrical
V-shape. The hull surface is smoothed down with emery paper of
increasing fineness. The hull is now ready for hollowing out.
 |
 |
 |
 |
 |
 |
|
(18)
|
(19)
|
(20)
|
(21)
|
(22)
|
(23)
|
| Scenic Display |
The
hollowing out is done with various round and flame-shaped
milling cutters mounted in the mini-drill. The remaining thickness is
easily controlled by holding the hull against a light source. Ideally
it should shine through uniformly over the whole hull. Of course the
area of the keel is left thicker. Prototype hulls are only 2 or 3 cm
thick, which translates into about 0.3 mm at the chosen scale ! The
inside of the hull is carefully smoothed using rotary diamond tools and
rubber-bound grinding wheels (CRATEX®-wheels).
On the outside the planks seems are lightly incised using a
knife-shaped engraving tool. These lines are later picked out in dark
ink. The recessed ties between the planks are also marked using the
engraving tool (Fig. 7). The wood was lightly stained with a dark grey
wood stain. Costelo does not take stain very well, which was actually
of advantage here as a slightly weathered appearance was intended. The
surface was sealed using wood primer (Schnellschleifgrundierung G1 from
Clouth, Germany) and lightly rubbed down using no. 000 steel wool.
The float was fashioned from a short stick of
beechwood, its rougher
appearance than boxwood being more akin to the prototype wood. The tree
'branches' that make up the outrigger and strengthening pieces of the
hull are made from copper and brass wire of different thickness. To
this end pieces of appropriate length were rather abused by bending,
straightening, hammering and covering coarsely in electronic soldering
tin - until they looked somewhat like branches. Were needed also
crotches were soldered on. These wire branches then received a base
coat of HUMBROL British Army Desert Yellow that comes
close in hue to the woods used.
All parts of the outrigger were tied together prototype
fashion ! The
material used for this is very fine two-ply twisted polyester thread as
once used for stitching up ladies' tights. Since mending tights seems
to have gone out of fashion, new supplies of this thread seem to be
impossible to come by. If you are lucky it may turn up on flea markets
(sellers always seem to raise an eyebrow when a man buys such stuff
...). The thread is dyed using mahagony wood stain, which gives it the
colour of coconut twine. Several length of this material are prepared
and the ends stiffened with a drop of zapon lacquer (also from Clouth
in
Germany) to facilitate threading. I prefer this lacquer over
cyanoacrylate glue because it is easier to apply controlled (with a
toothpick or an old paintbrush), does not degrade to this whitish
powder - and can be re-dissolved in an emergency. The bindings are done
as per prototype, for which sketches were available from the published
literature and my own observations. Some compromises had to be made, as
the thread is extremely fine though, but still some five times
overscale. Therefore only two rounds were taken at each binding as
opposed to several in the prototype. The knots were secured with a fine
drop of lacquer.
The whole boat was given a thin coat with light-brown
furniture varnish
(CLOU®
Möbellasurlack), which makes the appearance more uniform and gives
it warm tint. The hull again was lightly rubbed down with steel wool to
give it a silky appearance and to provide a better key for the final
wash in dilute white water colour. This will appear patchy by intention.
The paddles were carved from thin Costelo shavings. The handles were
reduced to the correct diameter (0.5 mm) using a home-made drawing
plate. The bailer (2 mm long!) with its characteristic inside handle
was carved from a scrap piece of Costelo.
The prototype pandanus leave matte sails have a rather
coarse
appearance compared to canvas, but still were of incredible fineness as
is evidenced by museum samples. Starting material for the model sail
was the very fine silk weave that is used for model airplanes. A scaled
copy of the sail plan was stuck to a piece of stiff cardboard that then
was covered with cling-film. Strips of the silk were cut of a width
that is to scale with the width of the individual mattes from which
the sail is composed. This strips were laid out on the sail plan with a
narrow overlap to represent the seams and pinned down outside of the
sail. The whole arrangement was then lightly brushed in the wood-primer
mentioned. This stuff has many good properties including of drying
within a few minutes. Once dried the sail is cut out allowing a margin
for turning over as doubling. The doubling is bent over a thin copper
wire laid into the seam and tacked down using cyanoacrylate glue - the
only place were CA was used. The wire allows to sculpt the sail and
prevents the silk from ripping when bent to the yard and boom. The next
step was painting the sail in acrylic paints, whereby the base coat was
applied by airbrush. The texture of the silk was somewhat highlighted
by 'dry brushing'. As the matte sails have the appearance of polished
wood due to their repeated treatment with coconut oil for
water-proofing was model sails were given a light coat of semi-gloss
acrylic varnish.
The model was finally rigged up using the thread mentioned above and
all knots secured with drops of lacquer.
The Figurines
Human
figures provide the necessary scale and illustrate
the mode of use of such boats. A scenic display illustrates also the
environment in which these boats were built and used.
The
well-known German company PREISSER makes a range of nude figurines,
called 'Adam & Eve', in various scales. Even those at the 1:87
scale are broken down into individual bodies, arms, legs and heads,
allowing the composition of different postures. The tooling is
incredibly detailed, allowing even to distinguish individual finger
joints ! If one can trust Western photographers and their selection of
models, many Polynesian and Micronesion were well-proportioned by
'classical' standards, often athletic, but sometimes with a slight
inclination to obesity. My personal theory on this is that only people
of a robust constitutions with certain reserves of body fat would have
survived the arduous voyages during their migration over Oceania, but I
cannot reference this scientifically. Anyway, the 'academic'
proportions of the PREISSER set makes them very appropriate for those
islanders.
Photographs
in KOCH
(1961) and KENNEDY
(1931) show most people still wearing the traditional Pandanus leave
skirt. It is not certain, of course, whether they did this to just
please the ethnologist or whether their limited cash would not allow
them to buy Western goods. The otherwise ubiquitous printed cotton had
replaced the traditional tree leaves and bark tissues already on
Gaugin's pictures. The scenic display tries to capture some epic time
before Western goods swamped the markets, particularly in the wake of
WWII.
From the supply of body parts I composed three figures.
Two of them
operate the boat, while the third one is of more decorative nature. In
many regions fishing boats were 'tabu' for women, but they operated
boat themselves to cross lagoons or even to travel between islands. The
skirts or aprons are made from no. 000 steel wire and very thin paper.
The body parts were assembled using liquid polystyrene cement, which
was
also used to attach the pieces of clothing. Gaps were filled using HUMBROL
putty, which was painted over with the liquid cement to smooth and
blend-in the joints. The figurines then were given a base coat in a
dark-flesh
artists' acrylic paint using the airbrush. This base coat was left to
set for several days. Shadows and lights were added using appropriately
toned down and diluted acrylic paints. A light touch from the airbrush
in a reddish-brown translucent paint particularly in the shadows adds
depth and unity to the paintwork. The the flesh parts of the figurines
were finally varnished in a mixture of gloss and matte acrylic, while
the fabrics were left matte (Fig. 10).
The Scenic
Display
It is helpful to think of a 'story board' for the
scene first. Thus, I have been thinking of a sunny day with good, but
not too strong breeze blowing across the inner lagoon of one of the
islands. Consequently, there ripples and a bit foam, but no high seas.
The water is only a few metres deep, so it would appear crystal clear
and in a more greenish than deep blue colour. The scenery forms an integral part of the glass
case described in the following section.
While one has to be cautious using clear plastics
for representing the sea, this is case where it is almost a must. By
chance I came across a piece of daylight fluorescent acrylic glass and
thought this would make a nice effect. The fluorescence becomes
only visible at the cut edges. However, the acrylic artist's gel used
to model the ripples and wavelets has a refractive index close to that
of the acrylic glass. Thus some of the fluorescence appears on the
surface of the 'water'. The acrylic glass plate is cut to size to fit
on the base of the glass case. Work continued with milling a suitable
recess for the boat using various mills and diamond tools in the
mini-drill. In the next step the water was modelled. The base of the
case was painted in something like a turquoise colour and, after the
paint had thoroughly dried, the acrylic glass plate was glued on. Then
the boat was set into the recession and stuck into place using acrylic
gel and the water modelled around it. Finally white highlights were set
on the waves, around the boat and the steering paddle using artist's
acrylic paint.
The Display Case
The idea of a glass case with a
slanting front came to me when I saw some jewellery display and I
thought it makes an attractive change to the usual brick shape. As one
views the main pane almost perpendicularly this reduces also
reflections. Also, this semi-pyramid shape is rather appropriate to a
sailing boat.
Since having read McNarry's book on Miniature Shipbuilding
I have
constructed my glass cases all on the same principle. The brass edges
have largely decorative function, the structural strengths comes from
glueing the glass panes together. McNarry uses clear silicone sealant,
which I also did until one Saturday afternoon I discovered that the
cartridge had set. I then tried in my desperation the general purpose
glue UHU® and literally
'stuck' to it. To date my glass cases have survived several moves
around Europe.
Glass is not exactly cheap and oblique
cuts and precise dimensions add
to the cost. In fact, the display case is the most expensive part of
the model, not counting the work on it. I have the glass cut in the
shop and go over the edges with emery paper, making sure that no grains
get onto the surface. The panes are carefully cleaned using first water
with washing-up liquid and then white spirit. The case is then
provisionally assembled using clear tape. making sure not to touch the
edges that need to be glued and ensuring proper alignment. One pane at
a time is taken off the assembly and stuck back on, the top being the
last piece. The glue takes some time to dry, so there is enough time to
correct the alignment.
I begin with the glass part of the case
because it so much easier to
cut
wood to exact dimensions than glass. The base is built to fit the glass
case. It usually consists of a piece of thick plywood or builders board
around which a frame like an inverted picture frame is constructed. I
love the combination of mahagony and brass and so dye and varnish the
wood to resemble this wood.
With the glass case in place on the base,
the 'frames' of L-shaped
brass profiles can be fitted. I begin with the socket around the case,
which is actually stuck to the wooden base rather than to the glass.
The rough mitres can be cut with a pair of nippers. Fine fitting is
done by grinding down the mitres on the PROXXON pillar drill fitted
with an abrasive stone and a mitre guide. Carefully done, the joints
become almost invisible. Before glueing on, the brass is de-oxidised
using fine steel wool and degreased by wiping it down with acetone. The
different pieces are provisionally attached using sellotape and the fit
adjusted step by step. Once I am satisfied with the fit, the pieces are
taken off one by one and
glued down.
Literature:
DREWS,
R.A. (1945): A Gilbert
Islands Canoe.- American Anthrop., New Ser., 47: 471-4.
FALCK,
W.E. (2002): Boote der
Gilbert-Inseln (Kiribati, Mikronesien).- LOGBUCH, 2/2002: 146-150.
GOETZFRIDT,
N.J. (1992):
Indigeneous
Navigation and Voyaging in the Pacific — A Reference Guide.-
Bibliographies and Indexes in Anthropology, No. 6, New York etc.
(Greenwood Press).
GREENHILL,
B. (1976): Archaeology
of the
Boat.- 319 pp., London (A. and C. Black).
GRIMBLE,
A. (1924): Canoes in the
Gilbert
Islands.- J. Royal Anthrop. Inst. ...: 54:
101-39.
IRWIN,
G. (1994): The Prehistoric
Exploration and
Colonisation of the Pacific.- 240 S., Cambridge (Cambridge University
Press).
IRWIN,
G. (1998): The Colonisation
of the Pacific
Plate: Chronological, Navigational and Social Issues.- J. Polynesian
Soc., 107(2): 111-43.
HADDON,
A.C., HORNELL,
J. (1936-38): Canoes
of Oceania.- 3 Vols., Bernice
P. Bishop Mus. Spec. Publ.,
27/28/29,
Honolulu, Hawaii (Reprint 1976).
KOCH,
G. (1965): Die materielle
Kultur der
Gilbert-Inseln.- Veröff. Mus. Völkerk. Berlin, Neue Folge 6,
Abt. Südsee III: 216 pp., Berlin (SMPK).
KOCH,
G. (1984): Boote aus
Polynesien und
Micronesien.- in: KOCH, G. [Hrsg.]: Boote aus aller Welt —
Katalog der Ausstellung 30.01.-05.05.1985, Berlin-Dahlem: 11-31,
Berlin (SMPK/Frölich & Kaufmann).
NEYRET,
J. (1976): Pirogues
Océaniennes,
Tome II — II. Polynésie, III. Micronésie, IV.
Indonésie,
V. Inde, VI. Autres Continents.- 315 pp., Paris (Assoc. des Amis
des Muséés
de la Marine).
Contact:
webmaster at wefalck dot eu